Showing Posts For Abraxax.7135:
Very nice numbers. Have you considered Arcana/Air/Tempest Fresh Air build? I think it might be able to achieve comparable results to Fire/Air/Tempest staff build.
Good point! Usually Fire is the strongest damage option since with Fire/x/x we can get about 25% extra damage: 10% Burning Rage, and sitting in Fire about 5% from Empowering Flame and 10% from Pyromancer’s Training. But when doing the fast Fresh Air rotation, we are not in Fire for most of the rotation, so we don’t get the 15% from sitting in Fire anyway.
As you suggest, Arcana/Air/Tempest will give comparable damage to Fire/Air/Tempest when spending most time in Air. If we assume burning on the target, but also 5 boons, then the 10% damage from Bountiful Power replaces the 10% from Burning Rage. So I would agree, Arcana/Air/Tempest will give comparable results. Arcana also helps with personal fury uptime.
Actually, I may have been a little optimistic when evaluating the Fresh Air build, since I basically assume that the 15% damage loss from not sitting in Fire is balanced by the
high vulnerability from Weak Spot given all those hits from OLA.
@Verificus
You may be right, I should give Warhorn a closer look! About equipment, I would agree that it can really help to mix in different gear depending on the situation. There are some clever ideas in your build.
Big factors
Don’t take these numbers too seriously. There are several big factors that are much more relevant than a 10% or 20% difference in such estimates. Just a reminder:
- Your skills have to hit. If you rely on Lava Font, Overload Fire or Flamewall, you only get full damage for mostly stationary targets.
- Factor 1 to 5 depending on how many targets are involved.
- Do you have fury and 25 might all the time? 25 vulnerability? Breakbar control? Alacrity etc?
- Burst can be much more important than sustained damage, which is all we considered here.
- Ranged, melee, and in between. It is a little strange that Staff is in many situations the best ranged weapon and the best melee weapon. Long-range can be much better than trying to go close-range with overloads.
- Damage under pressure. If you have to dodge (say out of OLF), or move, or be rezzed, different skills are better at keeping your damage high.
Damage calculation
Most of the needed information can be found on the GW2 wiki.
Direct damage per second for various skills can be computed from the skill-fact damage given on the wiki, which is the tooltip damage at power 1000 without any other modifiers and assumes target armor 2600. Multiply the wiki number by (effective power/1000) and divide by the total casting time plus cooldown. The catch is that there is cast time and some after cast time, which people had to measure carefully. For cast times I use the nice table by DEKeyz (partially outdated) mentioned in DEKeyz’ excellent guide.
Average direct damage is proportional to effective power, which includes the average damage from critical hits. For example, exotic Berserker equipment with full might and fury gives power 3039 and effective power 5271.
Example: For effective power 5271, we compute for Staff/Fireball that dps = 343 * 5.271 / 1.4s = 1291/s.
To compute total damage, we should add up the dps from each skill in an optimized skill rotation. Instead, I used a quick and not too dirty estimate, the skill spammer. Assume that we cast all non-auto skills as often as we can and else we do the auto attack. We compute the total dps by adding up the different non-auto dps numbers, plus the dps from the auto-attack for the time that we are not busy casting the other skills.
Conclusions
These numbers are only rough estimates. They are no substitute for careful meta build crafting, but I think looking at ballpark numbers can point out interesting things to look into further. What I take away from all this is (for PvE):
- The classic staff meta can be improved by perhaps 10% with Overload Fire.
- Overload Air is an interesting alternative, but personally I have not yet tested enough builds in different content.
- Condition builds do seem to be viable as well. This holds up in game play, although I do miss the high damage against structures. From other posts, it would seem that condi Eles are outdamaged by Engis, and it would be nice to have actual numbers.
- Heart of Thorns adds a lot of variety (and I love it!), but with regard to DPS the Elementalist lost more than was gained if you figure in the cut to Frost Bow 4. Once you get over that, I think Elementalist is still a fun class to play, with lots of utility and many damage options.
All comments welcome.
Have fun.
(edited by Abraxax.7135)
Condition damage builds
Now that conditions stack well, there no longer is a killer argument against condition builds in groups. The question is what sort of damage we can obtain. We focus on burn damage here.
Sinister Fire/Tempest
4900 Dagger/Focus Fire
1800 OLF
900 Signet of Fire
7100 Dagger/Focus with OLF and Signet of Fire
- Tempest with OLF gives a damage boost of 25%. Signet of Fire is very strong against single targets.
- We assume that all the ticks from fire fields that do burning actually hit. Damage from burn on crit is not included.
Sinister Fire/Tempest with OLF and SoF
7100 Dagger/Focus Fire rotation
7300 Scepter/Focus Fire rotation
7000 Staff Fire rotation
6200 Staff Earth rotation (bleeds instead of burning)
- The different weapon sets give similar results, but almost 40% of the
damage comes from OLF and SoF.
Dire Fire/Tempest with OLF and SoF
6300 Dagger/Focus Fire rotation
6400 Scepter/Focus Fire rotation
5400 Staff Fire rotation
- One reason to use a condition build is that we can get Dire gear for a big increase in tankiness for a rather small loss in damage. For D/F, Dire gives 90% of the damage of Sinister while your effective health in Dire is at 260% compared to 100% for Sinister.
- Soldier gear can play a similar role for direct damage builds, but compared to Berserker you loose significantly more damage. Both comparisons become less favorable when not assuming full might and fury, but Dire or other condition gear is still worth considering.
Comparison of direct damage and condition damage
The ballpark numbers above say that a standard Berserker/Fire build gets about 7000/s, and that a standard Sinister/Fire build also gets about 7000/s.
- In practice, condition damage works far more slowly than direct damage. For up-front burst direct damage is easily two, three times more effective than condition damage. It used to be bleeds (very slow) compared to fast direct damage. Now it is burns (faster than bleeds) compared to direct damage that includes sources that tick over time (somewhat slower). As a very rough ballpark number, you may easily loose 50% of the longterm condition damage quoted above if the fights are too short for your slowly ticking burns/bleeds to make a difference.
- However, I think condition builds for Ele cannot be ruled out simply because the base damage is bad. Condition damage can be comparable to Berserker. And damage falls-off more slowly when making a transition from Sinister to Dire than for Berserker to Soldier.
- The direct damage is calculated for target armor of 2600, which is the tooltip/wiki default. However, does someone know what the average target armor is in PvE? The game seems balanced in the sense that for light armor of, say, 2000, direct damage is favored by 30%, and decreases against foes with higher armor, which favors condition damage. Some new content is designed to favor condition damage by large factors (Mordrem).
(edited by Abraxax.7135)
Introduction
Let us look at some ballpark numbers for Tempest DPS. After the various balance patches, I wanted to get a rough idea of how the different skills perform. Real in-game damage is complicated, so we won’t worry about 10% or 20% inaccuracies in the calculation below.
TL,DR:
- Tempest gets a modest boost in damage of roughly 10% when using overloads.
- Condition builds can in principle approach the damage of direct damage builds.
Let us assume: PvE. Exotic gear. Permanent Fury and 25 stacks of Might. For direct damage builds, a factor 1.5 from traits and other boni. For condition builds, maximal condition duration for a factor 2.0. For simplicity and since there are too many options, no other increases of stats from runes, food, skills, etc. We will focus on average sustained damage, as opposed to burst damage. Under some further reasonable assumptions that may not relate at all to what you see in the game™, we obtain the following numbers for damage per second.
Direct damage builds
Berserker Staff Fire/Air/Tempest
6100 Fire rotation
1600 OLF
7400 Fire rotation with OLF
- If we run Tempest, then Overload Fire (OLF) boosts our damage by 20%.
- Choosing Tempest over Water or Arcana looses 5% to 10% damage depending on specs. Overall Tempest gives us a modest damage boost of roughly 10%.
- The numbers don’t add up trivially because casting OLF takes away time from other skills.
Berserker Fire/Air/Tempest with OLF
7400 Staff Fire rotation
4900 Dagger/Focus Fire rotation
4800 Scepter/Focus Fire rotation
- Other main-hand options do significantly less DPS for a basic Fire rotation. The main reason is that Lava Font (which we assume to be traited for recharge and duration) is very strong at 3700/s. Of course, there are other reasons and situations where D/F or C/F may be preferred.
- Warhorn off-hand contributes less than Focus, mainly because the cooldowns are rather high, so we do not consider it here. May still make sense for its utility.
Berserker Fire/Air/Tempest with Fresh Air and OLA
6700 Staff Air-Fire rotation
6200 Dagger/x Air-Fire rotation
- Overload Air (OLA) becomes strong with Fresh Air because we can cast it roughly every 10 seconds. Channel OLA, swap to Fire, cast a quick fire skill for damage, swap back to Air after the first critical hit. Or wait for OLF to come up, which gives similar damage, but fewer boons and is a little harder to land.
- Overloads scale with weapon strength, so OLA on staff is 10% stronger than on scepter or dagger.
- Updated 11/10/2015. Lowered numbers for OLA builds by setting damage modifier to 1.4 instead of 1.5. We loose Bolt to the Heart and the bonus from sitting in Fire, but we gain some damage from Harmonious Conduit and Weak Spot with frequent OLA hits.
(edited by Abraxax.7135)
Concise, clear, nice movies! I think this guide deserves a sticky.
Perhaps worth a comment: I find that after the patch the conjured Flame Axe has replaced Arcane Wave on my utility bar. Typically I combine it with the Lightning Hammer and/or the Frost Bow. I like to go 30 in Fire for might and fury stacking.
Arcane Wave does 1 blast every 30 seconds (not traited). The Flame Axe can do 1 blast every 6 seconds and has two fire fields on 15s cooldowns. Both AW and the FA blast are now targeted, so there is no difference anymore in that regard. AW has one main advantage: it is quick.
For might stacking, also for pre-fight stacking, the Flame Axe works well together with Scepter/X or even Staff. The idea is to conjure the Flame Axe for just one (perhaps two) blasts and fire fields, then drop it again. Since you get two conjured FAs, this is worth at least 2 blasts and 2 fields.
A simple rotation for Scepter/Dagger, say for pre-fight might/fury stacking, is to start in Earth: FA4 – FA2 – DE4 – DE5 – SF2 – DF4 – SF3 – FA2. This gives 18 stacks of might without Arcane Wave and Arcane Brilliance.
With persisting flames, you can also do FA4 – FA2 – SF2, that is land the Dragon’s Tooth in the Flame Axe field, saving the off-hand Dagger field for a second Dragon’s Tooth and another Flame Axe blast. For example, FA4 – FA2 – SF2 – DF4 – SF3 – FA2 – SF2 – DE4 – DE5, which are 21 stacks of might and lots of fury.
Apart from might stacking, I like the Flame Axe as a 900 range weapon. There are situations where I simply cannot handle stacking on the boss with the Lightning Hammer. In such situations, or when your party is scattered, might stacking becomes difficult. Pop a Flame Axe and you have a hard hitting ranged weapon (single target, though) that provides lots of personal might. You can even trait Fire XII before such fights to get 2 stacks of personal might per second with FA1. Once at 25 might, hit with Frost Bow 4 or FGS. It’s situational, but I think it is a nice option if you need some distance and are not running Staff.
Btw, I love your FGS/spider clip!
As has been pointed out, offense versus defense is heavily situation dependent and there are many, many variables!
Since you ask for links, I have collected some math of vitality and toughness .
About picking gear considering trade-offs between effective health and effective power, here is a post on that (pre-dates Assassin gear).
As you can tell, I love the topic :-) Your video is certainly a neat idea, less dry than just text.
This thread is an excellent idea!
Many people have their own data, but often it is lost after some time, hard to find, and
sometimes it is not clear how reliable the data is, or there is conflicting information. A thread in this place basically solves the problem.
When writing about the post-patch Flame Axe , I realized again that reliable and complete DPS information can be hard to find. Without accurate cast and after-cast times we cannot do accurate DPS calculations.
A suggestion: I know that some people prefer skill coefficients, but for a quick
check it would be very nice to include the tooltip info like on the Wiki: damage
with 916 power versus 2600 armor. This can be easily and directly checked in
the Mists (without gear or boons). Actual damage is then computed by just
rescaling the power value.
Two comments:
The Flame Axe 1 auto-cast seems to repeat after 1.0s. I measured this in the Mists by
timing 25 hits, but not very accurately. Can someone confirm/improve this?
The Wiki appears to be wrong for the tooltip damage for FA1 and FA2.
Currently it’s 358 and 696, but in the mists I find 260 and 506 (you also have
to correct for the power bonus). Please confirm.
Thanks for keeping the information in this thread up-to-date!
Persisting Flames is definitely a very strong option! Depends on your group and the fight whether group buffs work, but I completely agree, that should always come before personal might.
Edit: Tried this again: Persisting Flames does not seem to affect FA3 or FA4 field durations. The 6s from standard FA4 is not long enough for two blast from FA2, which is too bad. Still, at +50% might duration, FA by itself should give up to 12 stacks of combo/blast group might plus fury.
FireXII for personal might is still a nice option when you are on your own.
(I’ll think about using A2 etc, usually the distinction seems clear from the context.)
(edited by Abraxax.7135)
Let’s look at some numbers.
For concreteness, let us look at a 30/0/0/0/0 +40 build, which gives additional 300 power. We choose FireVIII for the conjured charges, so 10 more points for FireXI or FireXII are cheap. I consider half Soldier, half Berserker equipment, see for example this post. Of course, if you don’t need it, the Soldier defense is wasted! And full Berserker always gives more damage, but let’s start somewhere in the middle. In the example power is 1972, precision 1272, crit chance 21%, crit damage 42%, effective power 2361, toughness 1284, vitality 1284, effective health 17388.
A full build would include for example 30 points in Air, which is worth about +20% in damage, plus around +25% from damage traits in Air and Fire. I’ll stick to 30/0/0/0/0 here for simplicity.
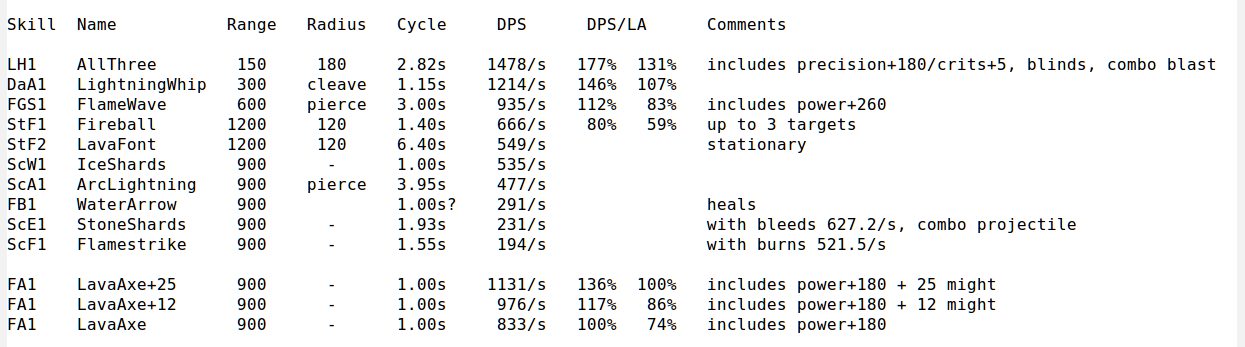
DPS
So, how does the FA1 ranged auto-attack compare to other ranged options? Have a look at the attached table. Note that the stat bonus for conjured weapons is included. The DPS column lists direct damage. Some of the information comes from Zelyhn’s thread. (At the time of writing, the Wiki appears to be wrong on the tooltip damage for FA1, Lava Axe. Based on tests in the Mists, it should read 260, not 358. Without gear, I get 311, which becomes 260 when corrected for the 180 power bonus.)
Our hardest hitting auto-attack is LH1. It hits several targets, blinds, and blasts, but only in melee range. DaA1 is not much behind (82% of LH1), but of course with advantages of its own. Then there is the FGS1 auto-attack, which is getting us to 600 range, but the FGS is not always available. The best options for range are found in Staff, but LH1 does more damage. Still if you want to hit more than one target at range, staff is an excellent option.
On the other hand, I prefer S/D and S/F conjurer builds for the nice synergy with conjured weapons: do lots of burst damage and might/fury stacking, then conjure. I therefore include the Scepter auto attacks. Not impressive, even when including condition damage, because most of the damage is single target. And I am not impressed by the FB1 damage, either.
Enter the Flame Axe. Even without might stacks, it is quite competitive. With 25 might stacks, LH1 only does 31% more damage, which is quite impressive for a 900 range weapon with lots of combo utility. StF1 only does 59% of the FA1 damage, however together with StF2 becomes comparable. But shouldn’t we look at the other ranged options with the same amount of might? Well, the FA is most impressive in situations where the might you provide yourself is the only might you get. Say, your party is scattered, running around a boss. Anyway, how many PUGs have you run with that consistently provide 25 might stacks for you? If possible, everyone should share the might, but the FA might is available even when you are on your own.
Conclusion
At least for my own playstyle, the Flame Axe fills a gap in standard conjurer builds. Your goal should still be to get as much damage as you can from the Lightning Hammer. If you can survive it, LH melee is the way to go. In between, do terrible things with your FB4 AoE whenever ready. However, there are some fights where I find myself at range, often against a single boss, and the new FA (with might) adds 70% damage over your standard ranged options, even beating the long-cooldown FGS by 20%. If you use Staff, FA’s blasts are still nice to have, but Staff provides superior ranged AoE to multiple targets.
One more general comment. You can do well with just LH1, and, I am afraid to say so, now you can also do well with FA1 at range with those 25 stacks of might. But you can do much better! As for all ranged attacks, stay as close to the fight as possible for party boons, rezzing, etc. FA and FB make a lot of sense when stacking, too. Try to think about all your options. This means dropping your conjured weapon and using all the utility available to you. We usually learn this while leveling, and in my opinion great conjurer play also means that you want to be fluid in the various standard rotations available in your weapon set. Just because you have traited for a LH-FA-Fire build doesn’t mean that you shouldn’t swap and do your S/F support or go staff for long range AoE in selected situations. Just my two coppers.
Attachments:
(edited by Abraxax.7135)
The new Flame Axe in PvE
After some play-testing with the 10/2013 patch, I would say that the Flame Axe is now a reasonable option right next to the Lightning Hammer, the Frost Bow, and the Fiery Greatsword.
I would like to discuss some of the pros and cons, and find out about your own experience. My comments are exclusively about PvE, specifically about dungeons. I assume a player of average skill (me :-) running with a PUG. This is not about organized, steady groups doing all-maxed Zerker speed runs. Let us assume that we run a conjurer build.
The LH is great for melee with some of the highest sustained DPS of the game. The FB gives great AoE burst on a longish cooldown. The FGS has a great mix of damage and mobility but with a very long elite utility cooldown.
Introducing the new FA
The FA does not see much use, although it used to be a good ranged weapon, possibly just another option for low levels. However, the patch added might per cast (!) for FA1, and a combo blast (!) to FA2, which goes well with the Fire combo fields FA3 and FA4. To support the FA it is natural to go 30 in Fire to get either FireXI for Persisting Flames (fury from blasts in fire fields) or FireXII for Pyromancer’s Puissance (might on fire spells).
As people have noticed right away, the might from FA1 stacks with the might from FireXII: you get 2 might for each FA1 attack. This makes it easy to gain and maintain 25 stacks of personal might!
The nice thing is that the FA1 auto-attack has rather a short cast and after-cast time. In simple tests (golems in the Mist, timed from 1st to 25th hit) the attack repeats after 1.0s plus/minus. Does someone have precise numbers? Anyway, even without extra boon or might duration, that means that we get up to 8 might from FA1 and 10 might from FireXII for a total of 18 might. With +40% or more boon/might duration you reach 25 might after about 13s and maintain those 25 stacks of personal might just by standing there and auto-attacking with FA1. Just try it.
In practice, you will use your combo blasts for group might, so you share the boons with your party and get to 25 might in under 10s. Say, Scepter F2, Focus/Dagger F4, Scepter F3, Conjure FA, FA2 into the previous fire field, some more FA2 into the fields from FA3 or FA4 between FA1 auto-attacks. Alternatively, you can give up some personal might using FireXI and the FA blasts for party-wide fury and might.
This turns the FA into a top-notch ranged weapon in the right build. It certainly closes a gap in my conjurer/LH/FB builds. You already have great melee from LH and great ranged burst from FB, but there are several situations where I wished I had a hard hitting 900 range weapon for sustained DPS. The FA is only single target, but yes, it does hit hard with all that might.
And it works really well with LH and FB. If you think LH hits hard, try it after pumping yourself up to 25 might. FB4 is strong, but with 25 might … I wouldn’t be surprised if the next burrow gets up and runs when it sees you coming. Too bad your might stacks trickle away outside FA.
(edited by Abraxax.7135)
Same thing happened to us yesterday:
Tzark got stuck in a wall after we used the waypoint to get past the closed doors.
We could not get him unstuck by teleporting or wiping. Grast was following us,
but Tzark remained stuck.
@FirstBlood: I completely agree, there are many other variables.
Good point, we should also look at protection!
Protection
Protection is a really intriguing boon, together with Might my favorite for the Ele. The post was simply getting too long, but here are my thoughts. I’ll ignore other types of damage reduction like Frost Aura.
Here we go again, don’t read on if you don’t want the math :-)
Protection and Toughness
The formulas indicate that protection becomes more efficient with increasing toughness, and toughness is more efficient when protection is on. The reason is that in the end we have to multiply two numbers for the effect of protection and toughness, which enhance each other.
Protection reduces incoming damage by 33%, so we have to multiply by a factor 2/3,
dps = 2/3 * B/a
To obtain the time to live, we divide health by dps,
ttl = 3/2 * h * a/B
Reducing incoming damage per second by 33% means that we live 50% longer (that is we can take 50% more damage).
How does this relate to toughness? Basically, the combined effect of armor and protection is
b = 3/2 * (a0 + t)
As already mentioned above as an example, to get that factor 3/2 from toughness alone we would need t=a0/2=918 so that
a0 + t = 3/2 a0.
In other words, Protection is worth 918 points in toughness when you start out with t=0. This is huge! Just compare it with other ways to get toughness.
Suppose now that you do invest 918 points in toughness, and add protection on top of that:
b = 3/2 * 3/2 * a0 = 9/4 a0 = 2.25 a0
You would need
t = 5/4 a0 = 2290
to get such damage reduction from toughness alone.
That is, the more toughness you already have, the more effective protection becomes. And conversely, if protection is on, then adding toughness has a higher return than without protection. At least when looking at your time-to-live.
Protection and Effective Health
What is perhaps surprising is that the strategy for optimizing effective health does not change! (I hope I am not confused about this ;-)
The reason is that protection appears in time-to-live as an overall factor. We define effective health with respect to t=0:
ttl = 3/2 * h * a/B = 3/2 * eh * a0/B
=> eh = h*a/a0
and the factor 3/2 drops out together with B. So whether protection is on or not, the same rules for getting optimal returns for v and t apply. (The size of the maximum in ttl changes, but not its location.) That is, we do not have to change gear or traits depending on whether we get more or less protection.
But careful, we have to be clear about the question we ask. The optimization does not change if we assume that we get protection for free. It is a different question whether it is more efficient to gear/trait in order to get protection instead of toughness or vitality. This is complicated. One stat point buys us the same amount of toughness or vitality, but how to compare with protection? So you give up t and v from runes, trait, food, or gear in order to get ArcanaV, boon duration, etc. for protection up-time.
Basically, we would want to generalize effective health to a function of v, t, and protection. For that we would need the conversion rate, otherwise we cannot define our finite budget like v+t+something*protection=totalpoints. It would be nice to have some game-play results. I didn’t do this systematically, perhaps someone can share his experience.
My rule of thumb is as follows. Since protection is easily worth 1000 to 2000 points in toughness, get some. This is situational (do you run with a Guardian? how easily does your playstyle allow protection? …).
However, what ever resources you have left to invest in vitality and toughness, go by the law of balance. As an Elementalist, first get 7500 health or healing, then add vitality and toughness in about the same proportion.
No worries. These calculations are just that: calculations, theory. Don’t take them too seriously. I am the first to say: game play is everything!
Personally, I find it intriguing that some isolated parts of a game like GW2 can be calculated. Imagine you design a game. Somewhere some math happens. I find it fascinating that some “simple” formulas can make a rather balanced game. But great game play certainly doesn’t require you to know the math. Just my 2 cents.
@ ThiBash:
The basic conclusion is that (without healing!)
- invest the first 750 points in vitality,
- divide any additional points equally between vitality and toughness.
For example, suppose you have 1000 points to spend. The plot tells you to put about 875 into vitality to get the maximum effective health. That is 750 in vitality to reach the balance, plus 125 in vitality and 125 in toughness.
If you assume a single 7500 heal, then this already reaches the balance, so then
vitality and toughness are equally important. But healing can be very situational.
Edited the original post to make this a little clearer.
@ Zelyhn:
Thanks :-)
(By the way, it’s nice that you keep your guide up-to-date, good reading.)
@ Grevender and ThiBash:
Yes, in principle you should be able to add vitality and toughness to the Elementalist to match the starting values of a Warrior.
The way effective health is computed, the Elementalist needs
18372 – 10805 = 7567 additional health or 757 vitality and
2127 – 1836 = 291 additional toughness
to get the effective health of the starting Warrior. That’s 1050 points!
Well, as you say, we then have to make sure everything else is equal, too! No extra boni from Signets or healing etc!
But if the other things are equal, then your upgraded Ele should take as little damage from direct hits as your basic Warrior. At least this is what the formulas for effective health say, i.e. there should not be any “hidden” boni for warrior.
Back to the original problem
Let us write the effective health as
eh(v,t) = (10/1836) * (1080.5 + v) * (1836 + t)
where I have cleverly pulled out an overall factor. The value of the maximum depends on that factor, but not its location. I factored the 10 so that v and t enter with the same scaling. The law of the square tells us that eh grows fastest for some finite budget
v + t = totalpoints
if the two variable factors in eh(v,t) have equal size.
Imagine that you start with v = t = 0, and that you are investing points one after one into either v or t. Then you may want to first invest into v until 1080.5 + v = 1836, or until v reaches
vfirst = 755.5
Basically, given a rectangle with sides 1080.5 and 1836, we first lengthen the shorter
side to get a square. But once we have a square, we should grow each side equally,
adding 1 to both v and t for the optimal increase of eh(v,t).
This strategy takes into account another constraint of the optimization, namely
v >= 0 and t >= 0.
We are simply not allowed to lower the toughness below 916, which would mean t<0, to get the optimal square with shorter sides. In other words, yes, we know how to find the maximum of a parabola, but its location may fall outside the allowed range of our variables! In this case the maximum is obtained at the boundary of the allowed range.
Summary
In summary, we are looking for the maximum of
eh(v,t) = (10/1836) * (1080.5 + v) * (1836 + t)
under the constraints
v + t = totalpoints
v >= 0 and t >= 0.
If totalpoints <= 755.5, then set
v = totalpoints and
t = 0.
If totalpoints > 755.5, then set
v = 755.5 + (totalpoints – 755.5)/2
t = 0.0 + (totalpoints – 755.5)/2
In other words, add points to vitality until you have reached the “golden” balance.
Once there, invest 1:1 in v and t.
Healing and effective health
The most important omission so far is that we did not discuss healing. As far as I can tell it is rather difficult to model healing realistically, since this becomes a calculation where the damage coefficients do not drop out, and the timing of damage and healing matters. However, even without healing, our calculation is relevant, because it gives a reasonable estimate of how well we can survive damage that we are not able to heal. (Which usually happens to me before I die ;-)
With all the formulas in place, there are two simple models for healing that I want to mention.
Suppose you manage on average a certain amount of healing per second, hps. Our hps competes with incoming damage per second, dps. Inserted into the time-to-live formula we get
ttl = h / (dps – hps)
Clearly, this only makes sense for dps > hps, else we out-heal the damage and live forever. The point to make is that the time-to-live is inversely proportional to dps-hps. As hps approaches dps, we have a 1/x pole that blows up for x=0. In other words, when hps approaches dps our healing can have a very large effect on our survivability. On the other hand, if hps is much smaller than dps, the effect is very small.
Now suppose you manage to heal yourself for heal=7500 points before you go down. Basically, you get off one healing skill with a little extra. We can account for such a finite amount of healing by changing the health formula to
h = h0 + heal + 10*v = h1 + 10*v.
All the calculations for the vitality-toughness balance remain the same! Except that h0 has to be replaced by h1. I picked heal=7500 because this is equivalent to the offset v=750 that we need to balance our stats. So, if you get one such heal, your vitality and toughness are equally important. If you get in two such heals, toughness will be more important! Assuming that you have enough effective health to survive the damage spikes.
In summary, when faced with lots of incoming damage that we cannot out-heal, we can still maximize our dps and effective health so that we kill before being killed. When there is not too much damage, we should consider dps-hps, but the result depends on several situational factors that are not easily discussed in general. However, a fixed amount of health through healing is simply equivalent to some additional vitality in the the vitality-toughness balance.
Exercises :-)
Repeat for other classes with different basic health and armor. See the nice table attached to that post.
Apply a similar logic to effective power, which is described by the function
g(x,y,z) = z * (1 + x*y).
(edited by Abraxax.7135)
Damage reduction
Yet another way to look at effective health is based on damage reduction, as was done here. If without toughness you take damage d(0) and with toughness d(t), then the relative damage reduction is
drd = (d(0) – d(t))/d(0) = 1 – d(t)/d(0) = 1 – a0/a
The relative damage taken is
dtk = 1 – drd = a0/a
For example suppose you build for extra toughness that is half your base armor, t = a0/2, which for the elementalist means t = 918. Then a = 3*a0/2 and
drd = 1/3, dtk = 2/3, or
drd = 33%, dtk = 67%.
In terms of your health we can now introduce an effective health equal to some damage before damage reduction. We reduce this damage to get the damage versus actual health, so we have
h = eh * dtk = eh * (1 – drd) = eh * a0/a
and again
eh = h * a/a0
Optimizing the vitality and toughness balance
Now that we have established, understood, and celebrated effective health, we want to get it efficiently. How do we maximize effective health as a function of vitality and toughness? We have
eh(v,t) = (10805 + 10*v) * (1836 + t) / 1836
Not allowed is changing h0 and a0, because then you wouldn’t be playing an elementalist!
Warning – entering an even worse math zone :-)
GW2 uses formulas with products of linear functions in several places, in particular for effective health, but also for effective power, so let me make some general comments first.
Essentially, we are asking how to maximize a function of two variables,
f(x,y) = x * y
But as stated this problem is not yet fully specified, because there are several extra conditions. We are dealing with a problem of constraint optimization.
Most importantly, we are operating with a limited budget of stat points. It is trivial to make f(x,y) arbitrarily large if you can make x or y arbitrarily large. However, our resources are finite. Let us assume that we have a finite number C of points to spend,
x + y = C,
then, if we pick a value for x, we can put at most
y = C – x
points into y.
Given some C, our function turns into a simple quadratic function of x,
f(x) = x * (C – x) = C*x – x^2
This defines a parabola, and we know how to find the extremum of a parabola. Perhaps this tells you something:
f’(x) = C – 2x = 0 => x = C/2 and f’’(C/2) < 0: maximum at x=y=C/2.
Intuition
For some quick intuition I find it more helpful to recall that f(x,y)=x*y defines the area of a rectangle. And we all know that it is the square that gives you the biggest bang for the buck, that is, the largest area for the shortest circumference 2(x+y)=2C. For the square, x=y, and therefore x=y=C/2 gives you the largest area.
(edited by Abraxax.7135)
Effective health – long explanation
Actually, it is not that hard, but the entire post is definitely tl:dr considering the topic. Yeah, I went into overkill mode, and I sometimes hit frogs for 200k or so, too. Yeah, I love math.
Don’t say I didn’t warn you! :-)
Effective health
Effective health is defined by
eh = h * a / a0
where
health h = h0 + 10 * v
armor a = a0 + t
and v and t are the points in vitality and toughness that we add beyond the level 80 base value of 916,
vitality = 916 + v
toughness = 916 + t
For the level 80 elementalist in light armor, the base values of health and armor are
h0 = 10805
a0 = 1836
See the wiki here and here. Sometimes effective health is defined without the division by a0, which I don’t find quite as useful.
In short, we compute effective health by
eh = (10805 + 10*v) * (1836 + t) / 1836
The key thing is that given v and t, we compute one number.
Effective health is your health increased by a factor
a/a0 = 1 + t/a0 >= 1.
Basically, we convert the extra armor due to toughness into extra health.
The claim is that effective health is a good measure of survivability.
Let me give not one, but three explanations for the meaning of effective health. Each gives an interesting angle on the problem!
Damage and Survival
The basic fact about life and death is that you go down when the damage d that is dealt to you is equal to your health h,
d = h,
or larger.
To proceed, we need the formula for how the damage you take depends on your armor and toughness. We can write this damage as
d(t) = A/a = A/(a0+t)
d(0) = A/a0
Here the constant A lumps together all those power and modifier factors you find on the wiki into one constant. Big A may be provided by Lupicus, little a is you. The larger the value of a, the smaller is the damage taken. This is nice, but we would need t=1832 to halve the damage, and you need special builds to even get to 1500 or so.
Damage to death
The damage you take before being downed is a function of toughness,
h = d(t).
The idea of effective health is to ask how large your health should be to survive the same attack (same attack factor A) without extra toughness,
eh = d(0).
We immediately get eh/h = d(0)/d(t) = a/a0, or
eh = h * a/a0
as advertised. The key thing is that the unspecified factor A has dropped out!
You can think of eh therefore as a measure of your one-hit survivability that is independent of the type of direct damage attack. It doesn’t matter whether it is one hit, a burst, or continuous direct damage, as long as there is no healing. Just imagine that either there is no time to heal, or that all your heals are on cooldown.
Time to live
Alternatively, we can ask about the time-to-live given some amount of incoming damage per second (dps). Our time-to-live is
ttl = h/dps
For example, with 15000 health and incoming dps of 1500/s, we live
15000 / (1500/s) = 10s.
Again, the dps is inversely proportional to the armor, now with a different constant B,
dps = B/a
so that
ttl = h * a / B
We can define effective health as the health we need for the same time-to-live for zero extra toughness t=0,
ttl = eh * a0 / B
Again, the unspecified constant drops out and we have
eh = h * a / a0.
Initially I found it surprising that your time-to-live depends linearly on your extra toughness,
ttl = h * (a0 + t) / B
Your time-to-live is proportional to your health (assuming constant incoming damage), and it is proportional to your armor a0+t.
(edited by Abraxax.7135)
Math of Vitality and Toughness for the Elementalist
Suppose you have decided to invest in vitality and toughness. Let’s not discuss how much you really need for survivability. Rather, assuming that you do want more vitality and toughness, let’s discuss how the numbers work out and how you can decide which one is more helpful.
The following has of course been discussed in various forms, so only some of it is new, as far as I know. See this post for a nice, perhaps even the earliest discussion. See also the discussion here. I look at equipment options here. I hope someone finds it useful, at least making these notes helped to explain it to myself.
Claimer: I never make mistakes, and I never get downed in fractals ;-)
Setting up the problem
Let us consider a level 80 elementalist, one of those squishies that braves the world in light armor with little health to begin with. (No, this is not the problem I mean, although it is a problem :-) Let’s assume exotic armor. We only consider direct damage in relation to health and armor. We ignore condition damage, dodging, killing your foes quickly. We ignore healing for now, but see below.
For direct damage, it is not obvious how to compare builds with different amounts of vitality and toughness. However, there is a compelling suggestion, namely to consider the so-called effective health.
For example, suppose a single attack would do 15000 damage against a character with zero toughness. With 33% damage reduction from toughness, the actual damage dealt is 10000 for the same attack. The game only shows you the 10000 and subtracts that from your health. The idea of effective health is to undo the damage reduction calculation and define 15000 as your effective health. Given two stats, vitality and toughness, we compute one number, your effective health for zero toughness, which allows us to easily compare builds with different combinations of vitality and toughness.
Effective health – basic result
Further down I outline the math behind this. However, let me give the basic result first.
Warning – entering math zone :-)
For the elementalist at level 80 in exotic armor, effective health is given as a function of vitality and toughness by
eh(v,t) = (10805 + 10*v) * (1836 + t) / 1836
where v and t is the extra vitality and toughness added beyond the base value of 916.
The question is how to invest your stat points for optimal return. Well, first you have to define a budget! And your budget is finite, else it is trivial to make eh arbitrarily large. For example, v + t = 1000.
If we insert t = 1000 – v into the formula for eh, then we get a quadratic function eh(v), that is, a parabola. This is great, because we know how to find the maximum of a parabola.
There is one complication. It can happen that the math finds the maximum for some negative number t. This means that we should take out points from the base value of 916, which we can’t. In other words, there is an additional condition of the form t >= 0. If the maximum is obtained for some negative value of t, we can
set t=0 and only invest in v.
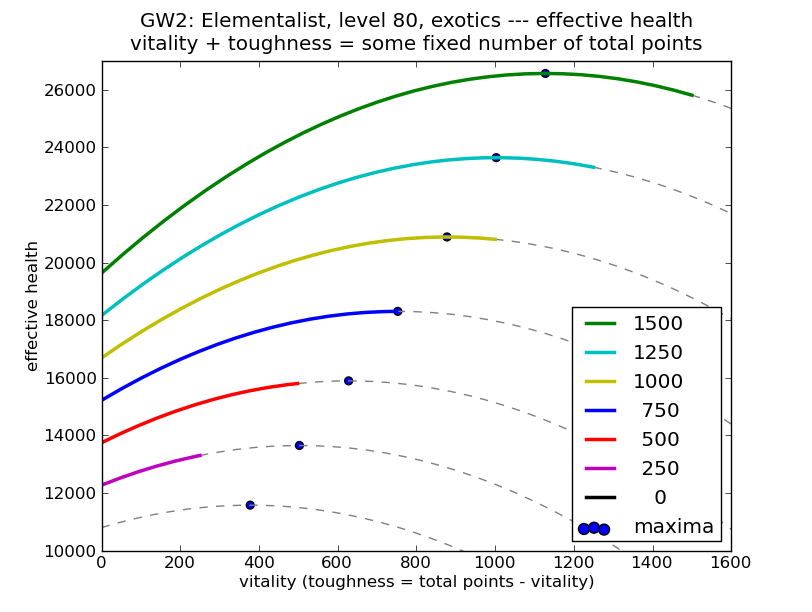
A figure that could be worth a thousand hitpoints
I love plots. Attached is a figure that shows effective health for different values of total points = 0, 250, 500, …, 1500.
All curves are pieces of parabolas.
The allowed range of values of v and t are shown in color. Outside this range the parabolas are continued as a grey, dashed line.
We show the maximum of each parabola with a dot. However, the maximum does not always fall into the allowed range. The actual maximum is then the upper edge of the colored bit of parabola.
The basic conclusion is that (without healing!)
- invest the first 750 points in vitality,
- divide any additional points equally between vitality and toughness.
For example, suppose you have 1000 points to spend. The plot tells you to put about 875 into vitality to get the maximum effective health. That is 750 in vitality to reach the balance, plus 125 in vitality and 125 in toughness.
Note that the parabola is rather wide near the maximum. This is good news because we may not have the flexibility in choosing our gear to hit the optimum precisely, but being off by 200 points in toughness or vitality only changes the effective health by about 1% (near the maximum).
However, if you move too far away from the maximum, then your investment may become rather inefficient. You can get higher effective health with less total points. 1000 points spent optimally give you more more effective health than v=0 and t=1500.
Attachments:
(edited by Abraxax.7135)
@Zelyhn
Good point, for a well-founded discussion you need to know the formulas that I actually used. The basic calculations come from the Wiki, but people seem to round-off differently, and there are different ways to define “effective” power and health. (The following does agree mostly with what Zelyhn suggested.)
For effective power I define
ep = p * (1 + q * (0.5 + d))
where
p = power
q = (precision – 832)/2100 = critical chance, capped at 1.0
d = critical damage/100
Note a small difference to the Wiki. I am not sure how I got there originally, but the formula for q assumes an exact value of 4% for the base value of precision of 916: (916-832)/21 = 84/21 = 4. The Wiki uses 822 and talks about rounding off the result. Perhaps someone can comment on rounding effects and what one should actually do here. Numerically and in the plots the differences would be small.
I compute effective health relative to light armor,
eh = h * a / al
where h is your health, a is your total armor (defense + toughness), and al is the base value for light armor 920 plus 916 for base toughness. We have
h = 10805 + 10 * v
a = al + t
al = 1836
where v and t are the extra points in vitality and toughness added beyond the basevalue of 916 at level 80. So we get
eh = (10805 + 10*v) * (1836 + t) / 1836
Thanks for the comments!
@Zelyhn:
I really like your suggestion to use effective health with some coefficient. As given, effective health is a very conservative estimate of our survivability. It is the one-hit survivability, i.e. we do not allow time for healing or other skills to save our skin.
Yes, ascended gear is certainly something worth looking at as well.
I’ll get back to you with the actual formulas that I used later.
(If you haven’t done this yet, Zelyhn’s guide is really worth reading.)
@Sabull:
Good point, it is not in the list, but very similar. Perhaps I misunderstand, but I think it is the fourth point from the left. I find
Sold Ruby Ruby Sold Bers 3116 eff.power
Sold Ruby Ruby Bers Sold 3319 eff.power
Bers Ruby Ruby Sold Sold 3319 eff.power
The reason for the last two is that I have lumped together the Back Item with Armor so that 6xArmor + Back gives almost the same major/minor stat contribution as 5xTrinkets: 337/240 and 336/240.
@covenn
I agree: this is just “raw” data. They might tell us something about an isolated part of the game, but your own ingame experience is key.
Plot 4 is an alternative way to plot the data in plot 3 for PVTPC gear.
We can look at the relative effectiveness of the builds by considering the product of effective health and effective power, let me call it EHP. (I haven’t seen precisely this before, but wouldn’t be surprised if it was discussed before, please comment below.)
Look at it this way. Twice the effective power means that you do twice the damage in any given time. Twice the effective health means that you live twice as long to do your damage (assuming some given amount of damage dealt to you per second that you don’t/can’t heal). So the product of effective health and power tells you correctly that you are able to do four times the damage before you are downed.
What do we do with that? Well, we plot it. Plot 4 shows EHP normalized by some constant to keep the numbers reasonable. We plot EHP versus effective power. As you can see, for 2200 to 3000 the effectiveness of the builds is roughly the same. In other words, you get what you pay for in return for your point investment. However, towards higher effective powers, your effectiveness in EHP drops. Berserker is not very effective on that scale, but of course EHP is a special way to look at things.
What does that mean? I can offer some nice visuals for that, too. Go, play the game to find out how well Berserker really works for you ;-)
I did not consider condition damage or magic find. But most importantly, I would like to have a good model for healing, which in turn makes toughness more important. The numbers already do change if you allow, say, one heal before you go down.
Attachments:

(edited by Abraxax.7135)
Plot 3 adds two things to the discussion.
First of all, in a real build you also want to add other sources of stats, so I decided to look at traits 20/30/0/20/0. This gives you 200 power, 300 precision, 30% critical damage, and 200 vitality. This could be a burst build for a scepter/dagger elementalist. Comparing with plot 2, this gives us a shift to bigger health/power values. If you look closely, it’s not just a shift, because our investment in precision and critical damage becomes more effective.
The hand picked points correspond essentially to mixing Soldier and Berserker gear. Even when mixed, these types remain optimal for effective health and power.
Starting with Berserker, we fill our equipment slots as follows. Recall that jewels and orbs (or runes) are more efficient in giving you critical damage, which partially explains the order in which we switch.
Armor Jewels Orbs Trinkets Weapons
Bers Ruby Ruby Bers Bers
Bers Ruby Ruby Bers Sold
Bers Ruby Ruby Sold Bers
Bers Ruby Ruby Sold Sold
Sold Ruby Ruby Sold Bers
Sold Ruby Ruby Sold Sold
Not all of the near optimal points are of this type. For example, different combinations of toughness and vitality give you similar effective health, so you may choose to mix in some Knight gears if you prefer toughness over health.
Can you guess what happens close to the Soldier point? (I’ll leave this as an exercise ;-)
Suppose you could wish for a new type of equipment with a new set of attributes. The way effective power works, it would be very interesting to get some pow/pre/vit equipment. This could beat Berserker in the inbetween region.
Well, you didn’t ask for it, but yes, I made one more plot :-)
Attachments:

(edited by Abraxax.7135)
Plot 2 shows the same data as the first plot in red, and in green we mark the location of PVTPC gear (power, vitality, toughness, precision, critical damage). 3 out of 5 of the PVTPC stats you get for Berserker, Knight, Sentinel, Soldier, Valkyrie, plus a few special cases.
PVTPC gear does better than the rest because effective health and power are computed from pow/vit/tou/pre/cri – points in other stats are wasted. We discuss a direct damage build that ignores condition damage and healing, but does include vitality and toughness.
Plot 2 also shows five points in blue for stats that you get for a full Berserker, full Knight etc builds.
Berserker (pow/pre/cri) is the maximal damage point. Basically: power rules. For average direct damage, power is more important than precision, and precision is more important than critical damage. Berserker wins, but also gives you minimal health.
Sentinel (vit/tou/pow) gives you the maximum in effective health. Since we ignore healing, the formula for effective health tells you to, roughly, invest the first 750 points in vitality, and then to equal amounts in vitality in toughness. Sentinel is very appropriate for that. We can only hope that the prices come down, or we might as well ignore Sentinel as a practical option.
The three points around 2100 effective power are, from high to low effective health, Soldier, Valkyrie, and Knight.
The location of Soldier (pow/vit/tou) is not surprising. It gives you the most important damage stat, power, and it gives you lots of survivability. Soldier gear is therefore a very reasonable suggestion for beginners or for difficult content (read: content that challenges your player skills ;-)
Surprising may be the location of Valkyrie (pow/vit/cri) and Knight (tou/pre/pow) gear. Since there are no Knight jewels, I used Emerald (pre/tou/pow). Basically, these two options loose because critical damage, precision, or toughness are not as effective as power or vitality in giving you effective health and effective power. It’s in the formulas. (Note the differences to the stats in PvP.) Of course, they do become good options if you change your criteria.
The question is, what is the optimal effective health-power gear somewhere between Soldier and Berserker? Are you able to guess?
Surprise, I made yet another plot :-)
Attachments:

(edited by Abraxax.7135)
Plot 1 shows a scatter plot where each point represents one particular gear combination. I plot effective health versus effective power. Effective health is your health plus the bonus for damage reduction due to toughness. Effective power is your power combined with the averaged effect from critical hits computed from precision and critical damage.
About the data:
- Level 80 exotic gear
- Light armor
- PvE gear only (no PvP amulets)
- Various options drawn from Soldier, Sentinel, Knight, Valkyrie, Berserker, Cavalier, Cleric, Carrion, Rabid, Rampager, Magi, Explorer, plus jewels; runes are too varied, but we allow orbs and crests
- To cut down the number of combinations, we vary things in groups: weapons, armor, trinkets, jewels, orbs/crests
- There are small inaccuracies, for example I didn’t bother figuring out the availability of back items.
- Looking at the plot, we do get a rather nicely filled out cloud of data points. There are more than 30000 points. The distribution would be smoother if we run through all single item combinations, but this doesn’t change things much. Also, we cover quite a range without major gaps in effective health and power despite the funny business of getting three stats per item, but not in all combinations.
We now can start answering some questions about optimal gear. If you really only care about effective health and power, you want to be at the upper-right edge of the cloud. For example, suppose you like 20000 efffective health. Then you would move to the right on the horizontal line at 20000 to the edge of the cloud to maximize your effective power.
The question is, what gear puts you at the upper edge of the effective health-power options?
First of all, you probably can guess what equipment gives you the point with highest effective power. What about the maximal effective health? Where is full Soldier, Knight or Valkyrie gear?
Happy surprise, I made more than one plot :-)
Attachments:

(edited by Abraxax.7135)
How can you find the optimal stats and gear for your playstyle?
If you are into fine-tuning your build, chances are you have experimented with one of those spreadsheets, or sites like GW2Buildcraft. Simple questions have simple answers. For maximum direct damage you choose straight Berserker gear. And if you don’t want any other stats (say, defense or magic find), you can stop reading now. Full Berserker is the answer.
However, suppose you do want other stats. If you like to have 18k health, how can you maximize your damage? How does your maximal damage change if you put 17k or 19k in health? Is the tradeoff between offense and defense worth it?
Mathematically, this comes down to a problem of constrained optimization, which is much harder than finding single purpose builds. Rather than thinking too hard, I decided to take a short cut.
I wrote a short little program that looks at all possible combinations of equipment and computes the resulting stats. And since I like visuals, rather than looking at tables I plot the result. Examples are attached.
Disclaimer: The conclusions may be well known to some of us, but I hope you find the explanations helpful. Also, I never have bugs in my programs, and I never get downed in fractals ;-)
Let’s move on to the first plot!
@kostbabis:
Good question! What exactly are the current attunement recharge rates?
The wiki says 15s and 1s: “When one is activated, the previous attunement recharges for 15 seconds, while other attunements which are ready to use will recharge for 1 second.”
And about the effect of the Arcane trait:
“Attunement Recharge Rate … effectively reduces recharge time of attunements by 1 second for every 5 points invested into Arcana. "
But when I tested this with 0 Arcane, I do get numbers very close to what you suggest, 16s and 2s. Someone probably can give us the exact status, perhaps this changed in one of the patches and the wiki is out of date?
For Arcane30, with an increase of recharge rate by 60%, the current cooldowns
would then be closer to 10s and 1.25s (not 9s and 1s which I used originally). This is nice: I thought I was simply slow or lagged so that I could never quite
get the 9s I expected. I will look into this more carefully and update the original post.
Still, just as you say, in practice one can get something like a 13s cycle, even without Fresh Air. Thanks for the confirmation. Which is nice for the boons – if we don’t have other things to do :-)
(edited by Abraxax.7135)
Excellent guide, among the best I have seen in some time! What I really like is the comparison of different builds, and that you refer to other sources as well. I consider myself a midrange amateur (fractals lvl 8), but anyway, here are my thoughts on Lightning Hammer (LH) builds.
LH builds are not that commonly seen, perhaps for good reason, and it might be that the post oversells their utility. The hammer excels in exactly one situation: you need sustained DPS, and you are able to melee without taking too much damage. Note that not all mobs are conveniently standing still, attacking only the other guys while being clobbered by your hammer. There are AoE attacks, random ranged adds, in some parties I do find myself drawing aggro, you run out of charges, etc. Having said that, personally I am a big fan of hammer builds!
My current favorites among hammer builds are (the names are just what I call them):
1. LH Water build (20/25/0/25/0 or 20/30/0/20/0)
This is perhaps the most widely known “standard” hammer build described in many places, rediscovered many times. Fire20 for extra conjured weapon charges, WaterIV for +20% damage against vulnerable foes, Air25 for vulnerability on crit. You sit in Water and swing away with, by a large margin, the highest sustained DPS available to the elementalist, highly competitive with what other classes can do. After the 6/25 patch I am undecided whether Water25 is still worth it (extra damage was reduced from 2% to 1% per boon).
2. LH Swapper build (20/0/0/20/30)
I completely agree with Neko, this is a nice build. Try it.
Personally I like Scepter/Dagger for the range and additional burst, but I don’t think this is important. From randomly reading posts on hammers, the earliest post I remember on something like a LH Swapper was a short note from 8/2012.
However, I do seem to play it slightly differently, or perhaps this is simply my misunderstanding since it is not mentioned explicitly for the Hybrid Dagger-Hammer build. The question is whether to sit in Water (for the damage bonus as in the LH Water build), or to swap attunements even after conjuring the hammer, or do both.
As anyone who has played the hammer will have noticed: While the LH is equipped, you can still swap attunements without loosing the hammer. (!) (Or any other of the conjured weapons.)
So while swinging away with the hammer, you do not have to stay in Water. You can swap attunements in an ongoing cycle to gain all the benefits associated with attunement swapping: boons from ArcaneV, heals from attuning to Water, might from Sigil of Battle, dodging with Evasive Arcana in different attunements etc. When you anticipate the need for a specific attunement, you stop your swapping so that, say, Water is not on cooldown when you need it. With Arcane30, we all swap. The idea of the LH swapper is to make this one of the playstyle objectives: it is easy and effective to keep a fast swapping cycle going.
On swapping, see also
https://forum-en.gw2archive.eu/forum/professions/elementalist/Fresh-Air-for-the-Attunement-Swapper/2347533
I think the most important point Neko makes about LH builds is that their range of utility is much better than you may think. It is possible to address some of the short-comings of the early LH-only-glass-cannon builds. Traiting Arcane30 looses some of the top-notch damage potential that you get from Air30 and sitting in Water. On the other hand, mixing in the classic elementalist playstyle of attunement swapping, you gain survivability and group support. And you are prepared for those situations where sitting in Water with the LH is not the answer. With the LH Water build, I sometimes feel like a one-trick ele, but traited in Arcane you are more versatile (use your burst, use range, etc).
2. With Fresh Air, post 6/25 patch:
Or: finally getting to the point :-)
Fresh Air allows us to shorten the four-attunement cycle from 12s to 10s.
One of the examples that didn’t work before now becomes an option:
1F 1W 1E 7A, 1F 1W 1E 7A, …: 10s cycle
Without Fresh Air, we could not get back to Air after only 3s in FWE, but with Fresh Air we can!
Again, there are variations, or irregular cycles where you swap to Air whenever possible to do some air bursts. Always assuming that you do get the critical hits to proc Fresh Air, but you can help with arcane utilities.
The bottom line is that in playtesting you can get to 10s or so rather easily, compared to the 12s without Fresh Air, plus a little extra for unavoidable short delays.
Just one example why this is neat. If you actually do cycle in 10s, then you can get permanent Protection from Arcane V with +100% duration gear (30% from Arcane30, food for 20%, 4 runes for 30% boon duration, and 2 runes for 20% protection duration).
3. Why I care but probably almost noone else:
You know Lightning Hammer builds, right? One of the versions I like is a “LH Swapper” build. Traits something like 20/0/0/20/30. The key observation is that you do not loose the hammer while attunement swapping. So while swinging away with your hammer, you can cycle through your attunements for boons from Arcane V. When you wonder how quickly you can do that, you find out about the 12s four-attunement cycle. But what about Fresh Air? The answer is rather ironic: you don’t have enough trait points to get both Air30 and Arcane30 since Fire20 is basically a must-have for the extra conjured weapon charges. If you insist on Fresh Air with something like 20/30/0/0/20, then your attunement recharge is at 11s instead of 9s for a 14.7s cycle. With Fresh Air your cycle becomes 12s. Well, this is where we started. Still, this now allows higher damage builds with Air30 without loosing boons, but loosing Evasive Arcana.
Fresh Air for the Attunement Swapper
Fresh Air has great potential for certain burst builds, with several nice examples around. What I would like to comment on is how Fresh Air can speed up continuous cycling. In a nutshell, your fastest, indefinitely repeatable four-attunement cycle used to take something like 12 seconds, now it is closer to 10 seconds.
I have not seen this discussed in such detail, certainly not after the patch, but my apologies if I overlooked something (please comment below). In any case, some of the details I find quite amusing, and perhaps not everyone is fully aware of them.
The 6/25/13 patch gave elementalists Air XII, Fresh Air: “Critical strikes will now recharge Air Attunement. This effect can only occur once every 5 seconds.” For all of us who swap attunements a lot, this is really neat: whenever you crit, Air attunement is available again right away, although air skills maintain their cooldown. At the time of writing, the 5s cooldown does not seem to be imposed (let’s see whether we get to keep this feature …).
How much does Fresh Air help when you swap attunements as often as possible? Think long boss fight, and you would like to maximize the boons from Arcane V. You trait Arcane30 so that the attunement recharge time is 9s, cooldown after swap is 1s. I will ignore small delays because of reaction time, lag, latency, etc.
1. Without Fresh Air, pre 6/25 patch:
This is what most of us are used to. 9s attunement recharge time means that your shortest four-attunement cycle is 12s.
For example:
3s in Fire, 3s in Water, 3s in Air, 3s in Earth, then repeat 3s in Fire, …
The basic fact is that after leaving say Fire, you have to spent 9s in other attunements. You could also do
9s F, 9s E, 9s F, 9s E, …: 18s cycle for 2 attunements
4.50s F, 4.50s A, 4.50s W, 4.50s F, …: 13.5s cycle for 3 attunements
Note that in each case 9s pass before you get to go back to Fire.
But who says you have to spend equal time in each attunement? Obviously, I can do better by mixing things up, can’t I? Well, no, I don’t think you can.
Here are two examples that do not work:
1F 1W 1A 7E, 1F 1W 1A 7E(x), …
We try to swap as quickly as we can right away, until we have to wait 7s in Earth so that Fire is available again.
First of all, we do get seven attunements in 13s (FWAEFWA), which is much better than four attunements in 12s. However, we want cycles that just keep going (not bursts where you stop/get stuck). Second, the final 7E is not possible, since Earth is not available yet after 3s in FWA!
The second example is what happens when we swap as quickly as possible without making a mistake with the final Earth:
1W 1A 7E, 1F 1W 7A, 1E 1F 7W, 1A 1E 7F, repeat
Now there are 9s between any two identical attunements. However, this is no faster than the four times 3s cycle, since you still get 1 attunement in 3s on average. Just count it, 12 attunements in 36s, or note that we are doing three attunements in 9s compared to four attunements in 12s.
These are just examples, but if you think a little harder about it, you can convince yourself that you cannot do better. The reason we usually don’t even have to think about it at all is that many cycles give the same optimal or near optimal result. We looked at the sequence 117117117…, but 126126126… works as well. The sum of three
consecutive numbers is always 9, which is all that is required.
Therefore, if you “swap as quickly as your skill rotations allow”, many of these will give you a 12s cycle for four attunements, or something that comes close. You may waste a second here and there waiting for an important skill to come off cooldown, but maxing Arcane V is rarely the only thing you want to do.